HOMEABOUT USSHOP HERECROPDATESCURRENT CHALLENGESTIPS&TUTORIALS

Friday, April 29, 2016

My World
by Tammy Klingner

Hello everyone!
 
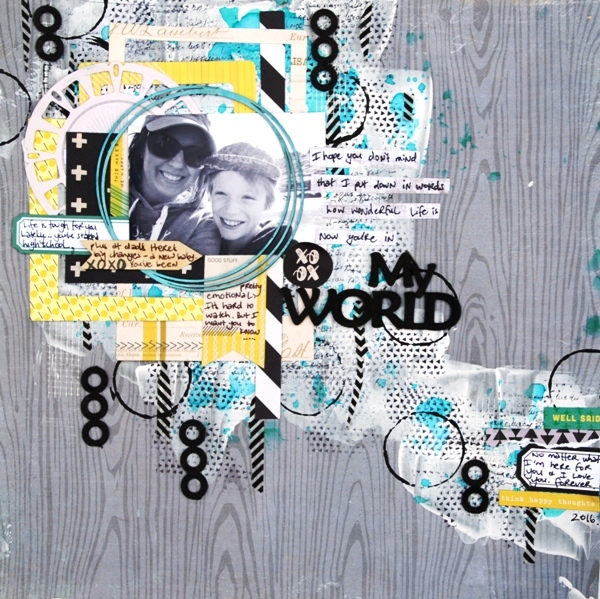
Today I'm sharing a layout featuring some papers from one of the last Basic Grey Range
ever created - the B Side. 
Oh how I love this range!
Fun, bright colours, with lots of great sayings. 
I created a  couple of pages with this range a couple of months ago, and I still had
plenty left, so thought I'd have a go at using some more up.

As this range is typically aimed at a tween girl, I decided to throw in an extra challenge
 for myself, and create a layout featuring my son.  You see this range has some great
 yellows and teals, and they were screaming out at me to be used.  I dug around and found
 grey woodgrain paper from Simple Stories. Perfect, as woodgrain has a masculine feel.
 
 
I swiped gesso over my background and then added spritz and random stamping. 
I then layered up with embellishments and paper off cuts.
 
 
I used 2 Crafty Chipboard for my title (I actually chopped up a title, and already have a plan to use the other half - yep no wastage here).  I also used 2Crafty chipboard to highlight my photo, and to add texture to the background.
 I created the black circles by making my own stamp.
I just added paint to an old toilet roll end, and used it as a stamp,  Cool huh??
 
 
And because I don't like to clean up unless I HAVE to, I created a Project Life Spread out of the rest of the paper from the range.
 
 
I'm really trying to keep up. Only a few weeks behind at the moment.  I love how bright and colourful this week is - and I've included the pink!
 
Here's the left side:
 
 
I wanted to include more 'Sports Day' pics but I didn't want it to take up any more spots in the week, so I added one of my flaps:
 
 
And here's the right side:
 
 
And that's it from me!
Have a great weekend, see you next week!!
 
Products used:
Simple Stories Hello Baby Grey Woodgrain/Chevron Paper
Basic Grey B Side Journal Cardstock Stickers
Basic Grey B Side Hey There Paper
Basic Grey B Side Fold Over Photo Frames
Basic Grey B Side Die Cut Pieces
Basic Grey B Side Journal Cards Paper
Basic Grey B Side Groove Paper
Basic Grey B Side So Anyway Paper
Photo Play Like a Girl Share Your Sparkle Paper 
Crate Paper Wonder Brave Paper
  2 Crafty You Rock My World Chipboard
2 Crafty Dotty Bits Chipboard
2 Crafty 6" Circle Revolution Frame
Cocoa Vanilla Made of Awesome Die Cuts
Simple Stories Life in Color Fundamentals Stickers
Simple Stories Carpe Diem Word Label Stickers
Pink Paislee Memorandum Labels Paper
Dylusions Ink Spray - Polished Jade
Kaisercraft Texture Stamp - Triangles
Dylusions Paint - Black Marble
White Gesso
Washi Tape
 
 Photobucket

Wednesday, April 27, 2016

Cocoa Vanilla Super Rad - Love You by Fiona Johnstone

Hello everyone

Back again today with another layout created with the awesome Totally Rad collection.  Love this timber look background paper, isn't it fab?

In today's layout Love You, I have used what has to be one of my favourite items ever. The Totally Rad Bits & Pieces set which contains so many cool and different embellishments - so amazing! I've also used a few other embellishments from the Totally Rad collection, including the super cute Woodies - nice and a bit different which is always good!


Another super cool product I have used on this layout is Graphite Texture Paste. In this close up you can see where I have used the paste on the chipboard piece - checkerboard clumps. I first inked the piece in black ink to get even coverage, then went over the little squares with the graphite texture paste. It is so cool!

Love these Amy Tan Thicker Words, the perfect touch to finish off my layout. 
 
Thanks for visiting
Till next week
Fiona
x
Photobucket
Products Used:
Cocoa Vanilla Totally Rad paper -  Top Gear
Cocoa Vanilla Totally Rad paper - Say What
Cocoa Vanilla Totally Rad paper - Stellar
Cocoa Vanilla Totally Rad paper - Happy Snaps
Cocoa Vanilla Totally Rad paper - Mixed Tape
Cocoa Vanilla Totally Rad  Die Cut Ephemera
Cocoa Vanilla Totally Rad Bits & Pieces
Cocoa Vanilla Totally Rad Woodies
2Crafty Checkerboard Clumps
AC Amy Tan Stitched Lucky Accent Words Black Foam
Finnabair Art Extra Texture Paste Graphite

Monday, April 25, 2016

Layout and Project Life cards by Rachel Lowe:

Happy Monday everyone.


My husband asked me why was I cutting out the clouds from one paper piece only to 
'put them on another piece of paper', men really don't get it do they!!!!!
 
I loved the cloud paper, not only did I fussy cut them out but I also sewed them onto
 my white background paper, in doing this I have created texture and depth.
 
As I have used a smaller photo I have ensured by matting, foam taping the photo and 
embellishing that my photo still remains the focus of the layout.


I love the clips from this collection and I have used it in a way to draw the eye to the photo.
How could I not use the dog, just a little bit cute and it is another way my smaller photo 
is framed of sorts.


With my left overs from this DT kit I just had to create some project life cards. 

This collection is so versatile as you can create traditional layouts, planners and project life cards.
I obviously have not written on my cards or added photos as yet as I wanted you to
 be able to view the cards clearly.


I have used the remaining die cuts and stickers to embellish my cards. I have sewn on each
 card to add even more texture and layouts. 
I always ensure I have plenty of cards to journal on when it comes to my Year in Review 
album (I do monthly to keep my commitment realistic) as this is where our everyday life
 is really captured.


 This month I kept the receipt to my daily Mocha and included it in my documenting as 
I am pretty sure that in 10 years we will all laugh at the price of a coffee!! 


My motto for project life is 'keeping it real'.


Here are some close up shots of my PL cards.


Thank you for stopping by today and I hope you get some scrapping time in the week.
X


Simple Stories Carpe Diem - bits pieces die cuts
Simple Stories Carpe Diem - clips
Simple Stories Carpe Diem- fundamentals cardstock stickers
Simple Stories Carpe Diem Paper - 3x4 journaling card elements
Simple Stories Carpe Diem Paper - 4x4-4x6 vertical elements
Simple Stories Carpe Diem Paper - don't mind me
Simple Stories Carpe Diem Paper - first bump
Simple Stories Carpe Diem Paper - pink dot black dot
Simple Stories Carpe Diem Paper - total chaos
Cardstock - white 12x12


Photobucket

Friday, April 22, 2016

Crate Paper's Wonder Layout
by Tammy Klingner

Hi everyone!
Happy FriYay! 
 
Today I'm here to share a layout I created with just a few pieces of paper from
 Crate Paper's Wonder Collection.
 
This layout began with the photo. 
I was sent this photo recently (taken 4 years ago) of myself and my beautiful girl. 
 I was overcome with emotion, as she looks so little! 
She is now 14 and blossoming into an amazing woman, and this photo really highlighted that for me - how much she has changed in the last four years, and how much she will continue to change in the next few.
I knew immediately I had to scrap it.
 
I wanted to go with soft colours.
You see, my girl loves strong bright colours (like me), but I wanted to go softer, as a contrast to complement and highlight the story, and the emotions I was feeling.
So I teamed some of the softer colours from the Wonder Collection with Kraft and soft pink and gold. 
I really enjoyed creating with these colours, and it was something different for me.
I couldn't  help add in some strong black though.
 
Anyway, here is the layout:
 
 
I applied gesso to my background paper, then added some soft spritz and flicks of gold.
I then layered up with papers, adding in some doilies, and 2Crafty Chipboard Clump Hearts to complement the softness.
Most of my papers were cut from the paper with the tags - I love it when a company creates a paper like this.  I sit and cut out the bits and then use them to tuck in and around my photo.
 
I discovered some Basic Grey Cork Stickers that complemented the layout, so I added them in too.
And finished it off with a few gold embellies.
 
 
I'm really glad I journalled and documented this photo!
 
For those who know my work, know that I usually create 'something' out of the leftovers on my desk, whether it be a Project Life Spread, or a card.  I find everything leftover co-ordinates so well that I can whip something up really quickly.
 
This week, I created a Card:
 
 
The only extra piece I added was the chipboard frame. 
Everything else was leftover from the layout.
 
That's it for today.
Have a lovely weekend!
Tam
xx
 
Products used:
Crate Paper Wonder Brave Paper
Crate Paper Wonder Discover Paper
My Minds Eye My Story Take Aim Paper
Crate Paper Shine Lucky Paper
2 Crafty Chipboard Clumped Hearts
Heidi Swapp Color Shine Pink
Heidi Swapp Color Shine Gold Lame
Basic Grey Sunkissed Cork Stickers
Crate Paper Hello Love Resin Gold Hearts with Words
Kaisercraft String
Kaisercraft Card - Kraft
Kraft Cardstock
Simple Stories Carpe Diem Chipboard Frames
Melissa Frances Paper Lace Doily
Teresa Collins Life Emporium Vellum Stickers
 
Photobucket

Wednesday, April 20, 2016

Cocoa Vanilla Totally Rad
Super Awesome by Fiona Johnstone

Hello everyone

So excited about this collection! It is Cocoa Vanilla's Totally Rad and it totally is Rad! Fab papers and the coolest embellishments in this range. I have created 4 layouts with it so far, and today I bring you the first one:

Super Awesome
The focus on this photo for me was the bright orange t-shirt my son is wearing and the dark background. So I have used the orange as my main colour and black highlights on a white background. 

I've got out the trusty Dylusions paints - such fantastic coverage, quick drying and easy to apply. I've swipped the paint across my cardstock and once it was dry added some stamping in black with a touch of lime. 


As you can see there are lots of paper layers to this page, I have then tucked some of the ephemera pieces under and over different layers. I've added some foam tape to mount my title Super Awesome that come from the die-cut packet. 


Thanks for stopping by and be sure to check out this cool range in store now!


Till next week
Fiona
x


Photobucket
Product List:
Cocoa Vanilla Totally Rad paper - Line Up
Cocoa Vanilla Totally Rad paper -  Top Gear
Cocoa Vanilla Totally Rad paper - Say What
Cocoa Vanilla Totally Rad  Die Cut Ephemera
Cocoa Vanilla Totally Rad Bits & Pieces
Dylusions Paint - Squeezed Orange
Kaisercraft Texture Stamp Chevron
Kaisercraft Texture Stamp Tiny Dot
Kaisercraft Texture Stamp Numbers

Monday, April 18, 2016

Carpe Diem by Simple Stories
Oh Yes layout by Rachel Lowe:


Hello and happy Monday everyone Rachel here again.

I set my self the challenge to create a boy layout after creating some very 'pretty and girly' layouts with this collection.

Firstly I chose my colour scheme and knew I wanted to use 2Crafty chipboard triangles on my page.
You can't beat turquoise, yellow and black as a boy colour combo.

I covered numerous sized 2crafty chipboard triangles with the teal and yellow dot paper.

I just love this photo of my son caught playing up for the camera, my layout is always created around my photo so I knew it had to be a 'fun' layout.

I have sewn on this layout in a messy fashion which suites the style of this layout.

I created the main body of my layout and then randomly placed my paper covered chipboard triangles for maximum visual impact.

I have added a camera from Coco Vanilla Studio as a finishing touch.


Here are some close up shots.


Having three boys I more often than not challenge my self to create a 'boy' themed layout with what is mostly considered more to favour 'girl' layouts. I am happy with how this layout turned out.


Thanks for stopping by today and have a great week.

X


Photobucket

Friday, April 15, 2016

Simple Stories Life in Color!
by Tammy Klingner

Hi Everyone
It's my turn to share on the blog today.
 
Lately I've been playing with Simple Stories Life in Color range.
I just LOVE it!
I love the colours, the phrases, the cameras, everything!
 
 
For this page, I set myself a challenge.
You see when it comes to my precious creative time, I sometimes feel like I waste a lot of time by shuffling the papers around, and by procrastinating. 
I want everything to be 'just so', and sometimes I walk away feeling like I haven't achieved much.
 
So for this page, I set the timer on my phone, for 45 minutes.
Eeeek!
Ready Set Go!
I was determined to be finished before the timer went off.  And I did.
It was fun.  I pretty much had to just DO IT! Not think about it, just cut and stick!
 
 
I'm happy with what I created.  It definitely helped that I got out some papers and embellishments from a 'range' and stuck with that!  It reduced my choices, and I knew it all co-ordinated - the hard work was done for me.
I even had time to add a bit of mixed media, with some paint smearing and stamping.
 
Whilst the range was still on my desk, as I've been doing lately, I tackled a Project Life Spread.
 
 
My biggest tip for this, if you would like to do the same is to order the 3x4 and 6x4 cut out papers from the range.
I start with these as my base, and then out of the scraps from my layout, I trim a few to these sizes as well.  This prevents all your pockets having quotes, it allows you to have some background-ish pockets to add photo to - and yet it's still co-ordinated.
 
 
And the right side:
 
 
I again added in a flap using washi tape, and back to back photos.  This allows me to add more into my Project Life weeks.
 
 
That's it for now, I'll be back next week!
 
Products used:
Simple Stories Life in Color 4x6 Journaling Cards
Simple Stories Life in Color 3x4 Journaling Cards
Simple Stories Life in Color Big Memories Paper
Simple Stories Life in Color Fundamentals Stickers
Simple Stories Life in Color Expressions Stickers
Simple Stories Life in Color Stickers 4x6 sheets
Simple Stories Carpe Diem Chipboard Frames
Simple Stories Carpe Diem Make it Happen Paper
Fancy Pants Happy Place Paper - Hello
Pink Paislee Memorandum Paper - Labels
White Bazzill
2Crafty Chipboard Asst Arrows
Kaisercraft Texture Stamp - Wood Panel
Dylusions Paint - Vibrant Turquoise
Clear Gesso
 
Photobucket

Wednesday, April 13, 2016

Crate Paper Shine - Life is Good by Fiona Johnstone

Hello everyone

Today I am sharing a layout created using Crate Papers Shine collection. I created a few pages with this collection a few months back but still had some paper left over and when I had this photo to scrap I decided the colours in this collection were perfect!

Life is Good


I wanted to focus primarily on the blue and grey in this photo, adding some pops of yellow, a hint of pink and black highlights. Firstly I created my background with some watered down Distress Spray Stain ink in blue, then some splatters of Distress Spray Stain in yellow. Finally I added some random stamping using Kaisercraft texture stampes. I also used my yellow Distress Spray Stain to colour my gauze. 

I then layered up some patterned papers that complimented my main colour scheme, adding a touch of pink to soften the page. The 2Crafty Chipboard square collage was inked and then I cut it into sections to layer underneath my patterned papers. I added the gauze between the paper and chipboard creating another layer. 


I completed the layout with an assortment of embellishments, layering both under the paper layers and over. I finished with an old piece of printed chipboard that I used for my title. 

Thanks for visiting
till next week
Fiona
x

Photobucket
Products Used:
Crate Paper Shine paper - Lucky
Crate Paper Shine paper - Darling
Crate Paper Shine paper - Dearest
Crate Paper Shine paper - Cherish
Crate Paper Shine Wood Veneer Shapes
2Crafty Chipboard Square Collage Panel
Crate Paper Open Book Ephemera 
Jillibean Soup Wooden Nickels
Flutterby Designs Flair 
Tim Holtz Distress Spray - Salty Ocean  
Tim Holtz Distress Spray - Lemonade
Kaisercraft Tiny Dot Texture Stamp
Kaisercraft Triangles Texture Stamp
Simple Stories Life is Good Chipboard
Gauze

Monday, April 11, 2016

Carpe Diem by Simple Stories - So Very Lovely layout by Rachel Lowe:


Hello my fellow scrappers.  Today I have created a very pretty and girly layout using the gorgeous Carpe Diem collection by Simple Stories.


I am a huge fan of dark florals (I am sure you have noticed!) and the colour combo of pink, teal, yellow and black is just stunning.


I have to say I was also taken by the dog wearing a floral crown and knew I had to have it somewhere on my layout.


I did not want to dark floral paper to over power the layout and hence why I have contrasted it against the white.


I have used the 3x4 inch element card as my title and this was the perfect place to attach the very cute dog (which I foam taped).


I have foam taped all the sticker elements to create depth. I have also sewn on this layout to add texture.


To finish this layout off I added the colour sticker dots in a random fashion.


Here are some close up shots of the layout.


I loved working with this collection and next week I will showcase another layout but it will be 'all about a boy'.


Thank you for stopping by today and see you next week.

X


Photobucket

Friday, April 8, 2016

Carpe Diem! by Tammy Klingner

Hi everyone!
 
This week I'm sharing a layout I created using Simple Stories Carpe Diem
This is a gorgeous range.  I love the bright, happy colours.
 
 
I chose to go with a white background as my photo was really bright. 
 I added watercolour to the background - I went with blue to go with the water in the photo, and added yellow as it was fresh and summery.
I cut a few strips and attached these to the right hand side of the page. 
Instead of layering papers behind my photo, I used a variety of chipboard frames from the range.
I adore these!! I use frames often in my layouts, I love tucking them behind layers.
But I think these may be my favourites!
 
 
I then added some 2Crafty Chipboard - I used both the messy heart, and the small mini hearts.  I painted them in matching colours to my layout.
I then added a few embellishments.
 
That's about it!
Quick, fun, and summery!
See you next week.
 
Products used:
Simple Stories Carpe Diem Chipboard Frames
Simple Stories Carpe Diem Paper - Make it Happen
Simple Stories Carpe Diem Paper - Pencil It in
  Simple Stories Carpe Diem Icon Stickers
Simple Stories Carpe Diem Planner Dashboard Inserts
White Bazzill  
2 Crafty Chipboard - Handrawn Frame Heart
2 Crafty Chipboard Tiny Hearts and Stars
Prima Watercolor Pencils - The Basics
Paint
Transparent Gesso
 
 
Photobucket

Wednesday, April 6, 2016

Simple Stories Life in Color - Today by Fiona Johnstone

Hello everyone

Happy Hump Day! I am back again with another layout created using the fabulous  
Simple Stories Life in Colour Collection

Today:
To compliment the fab bright colours in this collection I have created a bright background using Dylusions Paints in yellow then added some stenciling detail and stamping in contrasting black.  

Then I have layered up a selection of the papers, and added some tearing and banners for interest. 
 
 
I have layered up some of the stickers from the collection, the ephemera packet and added a self adhesive brad from the Life in Colour collction as well as a sticker from the Carpe Diem range.


My title Today is from the Life in Color  Ephemera pack, I have mounted the title with some foam tape. The little tag is also from the ephemera pack and I added some string to assist in pulling it out for journaling. 


Thanks for stopping by
Till next week
Fiona
x


Photobucket
Products Used:
Simple Stories Life in Color paper - Happy Little Moments
Simple Stories Life in Color paper - Big Memories
Simple Stories Life in Color paper - Love this Life
Simple Stories Life in Color Die Cut Ephemera
Simple Stories Life in Color Fundamental Cardstock Stickers
Simple Stories Life in Color Self Adhesive Brads
Simple Stories Carpe Diem Expressions Cardstock Stickers
Dylusions Paint in Lemon Zest
Kaisercraft Stamp
Staples